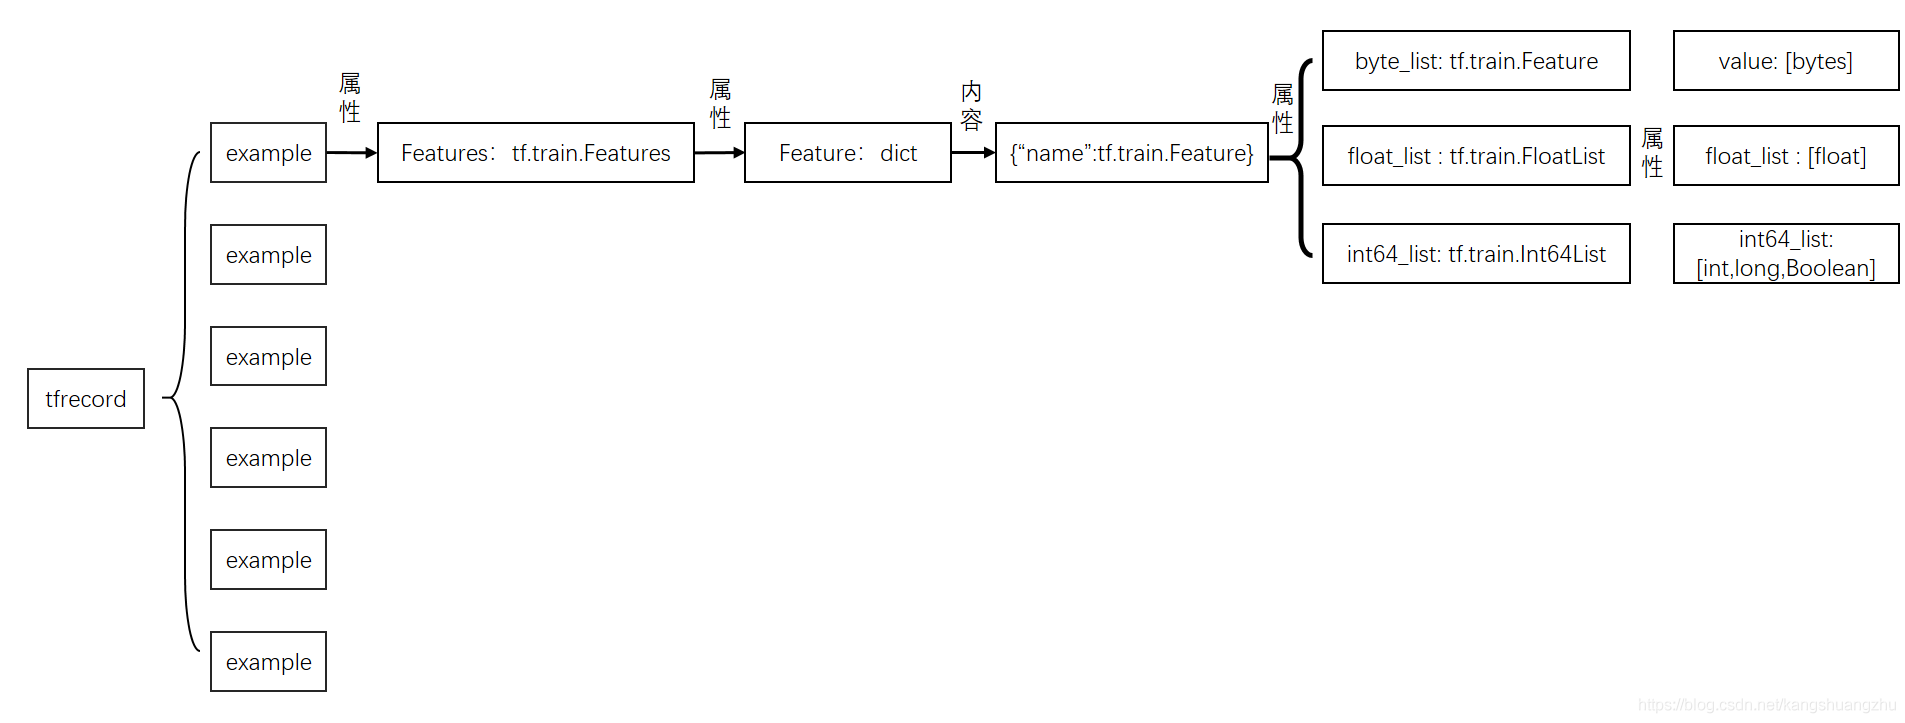
TFRecord
TFRecord 是谷歌推荐的一种二进制文件格式,理论上它可以保存任何格式的信息。
tf.Example是一个Protobuffer定义的message,表达了一组string到bytes value的映射。TFRecord文件里面其实就是存储的序列化的tf.Example。关于Protobuffer参考Protobuf 终极教程。
example
我们可以具体到相关代码去详细地看下tf.Example的构成。作为一个Protobuffer message,它被定义在文件core/example/example.proto中:
message Example {
  Features features = 1;
};只是包了一层Features的message。我们还需要进一步去查找Features的message定义:
message Features {
  // Map from feature name to feature.
  map<string, Feature> feature = 1;
};到这里,我们可以看出,tf.Example确实表达了一组string到Feature的映射。其中,这个string表示feature name,后面的Feature又是一个message。继续寻找:
// Containers for non-sequential data.
message Feature {
  // Each feature can be exactly one kind.
  oneof kind {
    BytesList bytes_list = 1;
    FloatList float_list = 2;
    Int64List int64_list = 3;
  }
};

// 这里摘一个 Int64List 的定义如下,float/bytes同理
message Int64List {
  // 可以看到,如其名所示,表示的是int64数值的列表
  repeated int64 value = 1 [packed = true];
}
看起来,是描述了一组各种数据类型的list,包括二进制字节流,float或者int64的数值列表。
综上所述
属于自己的Example
有了上面的分解,要想构造自己数据集的tf.Example,就可以一步步组合起来。
下面是一个样例:
用户A,年龄:25,城市:北京,最近7天中打开淘宝的天数:4,最近7天在淘宝上消费:289.4元。,最近7天浏览过的淘宝店铺id:123,456,789。
把上面的信息做成一条样本就是
value_city = u"北京".encode('utf-8')   # 城市
value_use_day = 7                      #最近7天打开淘宝次数
value_pay = 289.4                      # 最近7 天消费金额
value_poi = [b"123", b"456", b"789"]   #最近7天浏览电铺

'''
下面生成ByteList,Int64List和FloatList
'''
bl_city = tf.train.BytesList(value = [value_city])  ## tf.train.ByteList入参是list,所以要转为list
il_use_day = tf.train.Int64List(value = [value_use_day])
fl_pay = tf.train.FloatList(value = [value_pay])
bl_poi = tf.train.BytesList(value = value_poi)

'''
下面生成tf.train.Feature
'''
feature_city = tf.train.Feature(bytes_list = bl_city)
feature_use_day = tf.train.Feature(int64_list = il_use_day)
feature_pay = tf.train.Feature(float_list = fl_pay)
feature_poi = tf.train.Feature(bytes_list = bl_poi)
'''
下面定义tf.train.Features
'''
feature_dict = {"city":feature_city,"use_day":feature_use_day,"pay":feature_pay,"poi":feature_poi}
features = tf.train.Features(feature = feature_dict)
'''
下面定义tf.train.example
'''
example = tf.train.Example(features = features)
print(example)
上面代码运行结果为:
features {
  feature {
    key: "city"
    value {
      bytes_list {
        value: "\345\214\227\344\272\254"
      }
    }
  }
  feature {
    key: "pay"
    value {
      float_list {
        value: 289.3999938964844
      }
    }
  }
  feature {
    key: "poi"
    value {
      bytes_list {
        value: "123"
        value: "456"
        value: "789"
      }
    }
  }
  feature {
    key: "use_day"
    value {
      int64_list {
        value: 7
      }
    }
  }
}
把若干个example组合起来,然后转化为二进制文件,就是tfrecord。
TFRecord
TFRecord是一个二进制文件,只能顺序读取。它的数据打包格式如下:
text
uint64 length
uint32 masked_crc32_of_length
byte   data[length]
uint32 masked_crc32_of_data其中,data[length]通常是一个Example序列化之后的数据。
将**Example**写入TFRecord
可以使用python API,将Exampleproto写入TFRecord文件。
path = "./tfrecord"
with tf.io.TFRecordWriter(path) as file_writer:
  file_writer.write(example.SerializeToString())
TFRecord读取
path = "./tfrecord"
data = tf.data.TFRecordDataset(path)
以上实际上就已经完成了tfrecord的读取过程。很多人会说,可是无论平时使用还是工程中,都会用一个map方法对data进行变换呀。没错,如果使用需要进行变换,这是因为我们在保存tfrecord的时候,先把一个example序列化成二进制,然后再把二进制字节变成一个string,这样每个example就是一个string保存在了tfrecord 中。而读取过程同样,通过tf.data.TFRecordDataset,我们已经把每个example变成的string以 tf.tensor(dtype=string) 的方式读取进来了。所以我们完全可以用下面代码看读取结果
for batch in data:
  print(batch)

#结果
#tf.Tensor(b'\nQ\n\x0f\n\x03pay\x12\x08\x12\x06\n\x043\xb3\x90C\n\x12\n\x04city\x12\n\n\x08\n\x06\xe5\x8c\x97\xe4\xba\xac\n\x10\n\x07use_day\x12\x05\x1a\x03\n\x01\x07\n\x18\n\x03poi\x12\x11\n\x0f\n\x03123\n\x03456\n\x03789', shape=(), dtype=string)这里还有另外一个大坑,data是一个TFRecordDatasetV2类,但同时,它也是个可迭代对象,所以就算找遍它的所有属性和方法,都找不到它保存数据的tensor,但是可以通过迭代看到。
当然只是把example序列化的字节,读取出来是不能用的,我们还是要把其中数据解析出来,这时候就要用到熟悉的map 方法了
def decode_fn(record_bytes):
  return tf.io.parse_single_example(
    record_bytes,
  {
    "city":tf.io.FixedLenFeature([],dtype = tf.string),
    "use_day":tf.io.FixedLenFeature([],dtype = tf.int64),
    "pay":tf.io.FixedLenFeature([],dtype = tf.float32)
    ,"poi":tf.io.VarLenFeature(dtype=tf.string)
  })
data2 = data.map(decode_fn)
tf.io.parse_single_example 输入是一个string的tensor ,输出是一个 dict ,格式就是如入参中的格式,应该注意的是,入参中的key应该去全部在example中出现过,否则会报错。
在弄懂了data的内容之后,我们就可以通过下面的方法调用decode_fn:
for batch in data2:
  print(batch)

#结果
#{'poi': <tensorflow.python.framework.sparse_tensor.SparseTensor object at 0x7fcc0abac908>, 'city': <tf.Tensor: id=36, shape=(), dtype=string, numpy=b'\xe5\x8c\x97\xe4\xba\xac'>, 'pay': <tf.Tensor: id=37, shape=(), dtype=float32, numpy=289.4>, 'use_day': <tf.Tensor: id=39, shape=(), dtype=int64, numpy=7>}
tf.io.parse_example
如果把标量变形成一个向量或者张量,这样的入参不符合tf.io.parse_single_example的入参定义,就会报错
而tf.io.parse_example正好相反,tf.io.parse_example可以解析一批example,所以他的入参是一个向量,就算是只对一个example进行解析,也必须把标量变形成向量,也就是说应该写成
def decode_fn(record_bytes):
  return tf.io.parse_example(
    tf.reshape(record_bytes,[1]),     #注意这一行发生了变化
  {
    "city":tf.io.FixedLenFeature([],dtype = tf.string),
    "use_day":tf.io.FixedLenFeature([],dtype = tf.int64),
    "pay":tf.io.FixedLenFeature([],dtype = tf.float32)
    ,"poi":tf.io.VarLenFeature(dtype=tf.string)
  })
data2 = data.map(decode_fn)
这里应该注意,tf.io.parse_example的第一个入参只能是向量,绝对不能是二维以上的张量,否则同样报错。
对可变长sparse特征的解析结果不同
这个区别是非常有趣的,我们来看上面的poi这个特征,他是一个sparse特征,无论是通过tf.io.parse_example 还是tf.io.parse_single_example,我们都是把字符串解析了出来,得到了 ["123", "456", "789"]三个店铺id,但实际上一般都要对这类特征进行onehot,变成数值类型的输入。
用tf.io.parse_example得到的onrhot编码是一个向量例如,假设一共有5家店铺[a,"123", b, "456", "789"]。那么用tf.io.parse_example和parse_single_example在经过onehot会得到的结果不同
poi = tf.feature_column.categorical_column_with_hash_bucket("poi", hash_bucket_size=15, dtype=tf.dtypes.string)   #创建poi特征
poi_idc = tf.feature_column.indicator_column(poi)  #onehot处理
feature_column = [poi_idc]
feature = tf.feature_column.make_parse_example_spec(feature_column)  #生成poi的featuredict
path = "./tfrecord"
data = tf.data.TFRecordDataset(path)  #读取tfrecord
#分别用tf.io.parse_example 和 tf.io.parse_single_example 解析数据
data2 = data.map(lambda x : tf.io.parse_example(tf.reshape(x,[1]), features = feature))
data3 = data.map(lambda x : tf.io.parse_single_example(x, features = feature))
结果:
for batch in data2:
    tensor = tf.compat.v1.feature_column.input_layer(batch,feature_column)
		print(tensor)
for batch2 in data3:
    tensor2 = tf.compat.v1.feature_column.input_layer(batch2,feature_column)
		print(tensor2)
#结果
# tf.Tensor(
#[[0. 1. 0. 0. 0. 0. 0. 0. 0. 0. 0. 0. 0. 0. 0.]
#[0. 0. 0. 0. 0. 0. 0. 0. 0. 0. 0. 0. 1. 0. 0.]
#[0. 0. 0. 1. 0. 0. 0. 0. 0. 0. 0. 0. 0. 0. 0.]], shape=(3, 15), dtype=float32)

#tf.Tensor([[0. 1. 0. 1. 0. 0. 0. 0. 0. 0. 0. 0. 1. 0. 0.]], shape=(1, 15), dtype=float32)tf.io.parse_example的结果,在用tf.compat.v1.feature_column.input_layer生成输入时,可以把所有的特征一起生成
而tf.io.parse_single_example的结果,只能对sparse特征逐个生成,然后合并成起来。
Preference
Tensorflow官方教程:TFRecord 和 tf.Example
tensorflow2.0 环境下的tfrecord读写及tf.io.parse_example和tf.io.parse_single_example的区别